ສຳລັບ Windows 7, 8.1, 10
1. Right-click the network icon in the notification tray and select Open Network & Internet settings.
2. ເປີດ Network and Sharing Center.
3. Click on your network adapter.
Welcome to my blog
ສຳລັບ Windows 7, 8.1, 10
1. Right-click the network icon in the notification tray and select Open Network & Internet settings.
2. ເປີດ Network and Sharing Center.
3. Click on your network adapter.
Requirements
IPBan free version requires .NET 8 SDK to build and debug code. For an IDE, I suggest Visual Studio Community for Windows, or VS code for Linux. All are free. You can build a self contained executable to eliminate the need for dotnet core on the server machine, or just download the precompiled binaries in releases.
Running and/or debugging code requires that you run your IDE or terminal as administrator or root.
Officially supported platforms:
Windows 10 or newer (x86, x64)
Windows Server 2016 or newer (x86, x64)
Linux Ubuntu x64 (requires firewalld)
Linux Debian x64 (requires firewalld)
Linux CentOS x64 (requires firewalld)
Linux RedHat x64 (requires firewalld)
Mac OS X not supported at this time
Features
Auto ban ip addresses by detecting failed logins from event viewer and/or log files. On Linux, SSH is watched by default. On Windows, RDP, OpenSSH, VNC, MySQL, SQL Server, Exchange, SmarterMail, MailEnable are watched. More applications can easily be added via config file.
Additional recipes for event viewer and log files are here: https://github.com/DigitalRuby/IPBan/tree/master/Recipes
Highly configurable, many options to determine failed login count threshold, time to ban, etc.
Make sure to check out the ipban.config file (formerly named DigitalRuby.IPBan.dll.config, see IPBanCore project) for configuration options, each option is documented with comments.
Banning happens basically instantly for event viewer. For log files, you can set how often it polls for changes.
Very fast - I’ve optimized and tuned this code since 2012. The bottleneck is pretty much always the firewall implementation, not this code.
Unban ip addresses easily by placing an unban.txt file into the service folder with each ip address on a line to unban.
Works with ipv4 and ipv6 on all platforms.
Please visit the wiki at https://github.com/DigitalRuby/IPBan/wiki for lots more documentation.
[Read more…]
Cloudflare
Cloudflare is one of the most modern solutions to supercharge your website and add security. They power more than 20 million Internet assets and have a presence in more than 200 data centres.
cloudflare-cdn
Some of the following useful features are offered by CloudFlare in a FREE plan: Globally load-balanced CDN, Content caching, instant purge caching, Async Javascript loading (Rocket Loader), IPV6, HTTP/2 & HTTP/3, WebSockets, Restful API, Basic DDoS protection, TLS 1.2, 1.3, Cloudflare issued certificate, HTTPS Rewrites, Comment spam protection, content scraping protection, DNSSEC, Operational & Threats insights, Page rules, etc.
You can set up your website with Cloudflare in less than five minutes. It’s a great deal to supercharge and secure your website.

Gcore CDN
Gcore has a great content delivery network of 150+ data centers. This means blazing-fast websites for every user spread across the globe. Besides, its 30ms average response time makes it one of the fastest CDN out there.

Moreover, it has a generous free plan to test the waters. The FREE tier includes 1 TB of traffic per month.
Some of the advanced features include:
HTTP/3 support
Free SSL certificate
DDoS attack mitigation
Free entry-level WAF
Log viewer
Image optimization service
Full-fledged API
Terraform support
Jetpack
Formerly known as Photon is not the complete CDN instead of an image acceleration service. If you are using WordPress and heavily use images, then Site Accelerator would be a value-add.
What Is Self-Hosting?
Self-hosted emails are the servers that can be hosted in your local network or your server. If you want, you can always use it by integrating with third-party email accounts. However, its primary function is to let you create your very own email server.
1. Modoboa
Modoboa is an open-source email server that emphasizes your privacy. It works as a perfect alternative to other email service options as it only takes around 10 minutes to create a mail server for you.
Here, you get some of the best open-source email server installation, configuration, and security tools. This platform offers all the basic email gestures, including webmail, contact list management, calendar management, email organization using filters, auto-responder for emails, and an unlimited number of mailboxes, alias, and domains.

2. Mailu
If you are looking for a feature-rich yet simple-to-use self-hosted email server, go for Mailu. This free software aims to provide users with a server that can be easily set up and maintained. It does not contain unnecessary features found in many groupware.
The platform lets you use standard email servers and protocols like IMAP, IMAP+, SMTP, and Submission. Besides web access, it comes with features, such as multiple webmail, domain aliases, custom routing, and administrative interfaces.
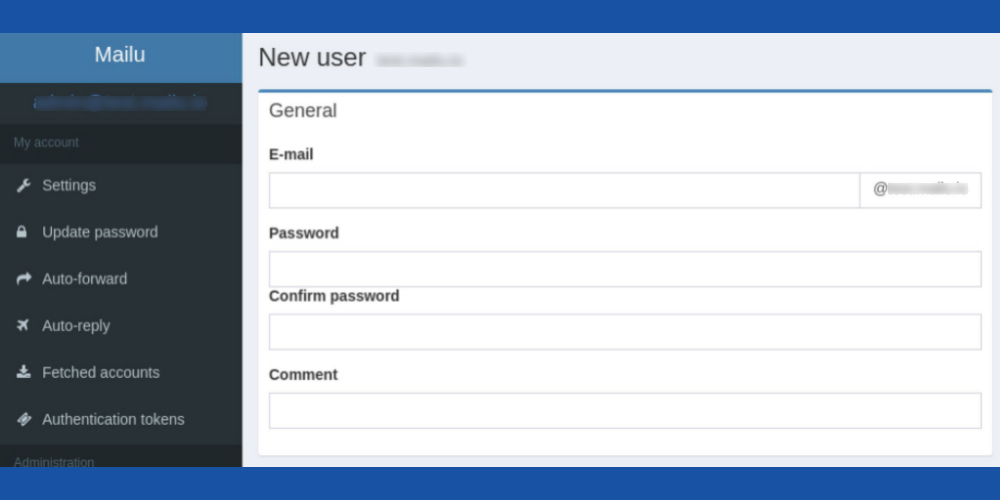
Mailu self-hosted email server
Users can easily use aliases, auto-forward, autoreply, and fetched accounts to save time and effort. Global admins, per-domain delegation, announcements, and quotas are some of its administrative attributes that will let you seamlessly manage this email server.
Moreover, the platform uses TLS, Letsencrypt! certificate, outgoing DKIM, greylisting, antivirus scanner, anti-spam, auto-learn, DMARC, and SPF to ensure maximum security.
3. Docker MailServer
Docker MailServer is an open-source and full-stack mail server that supports email service through SMTP, LDAP, and IMAP. This production-ready solution comes with only configuration files that keep it simple and versioned. The server has no SQL database and can be deployed and upgraded readily.
It also supports creating custom rules for SpamAssassin and ClamAV, including automatic updates. The server uses LetsEncrypt and self-signed certificates to ensure data security. Users also get features, like setup script for server configuration and maintenance, basic Sieve support through Dovecot, persistent data and state, and extension delimiters.
Your device should have 1 vCore and 512MB RAM to run this server. However, you should deactivate services like ClamAV to run on a host containing 512MB of RAM. For optimum performance, the recommended configuration includes 1 Core processor, 2GB RAM, and enabling swap for the container.
[Read more…]
To get your transactional emails successfully delivered, we’ve put together a list of free SMTP servers (also called SMTP relay service) that have gone through our rigorous deliverability tests. And here’s the best part – they are not just reliable, they’re also completely free to use with certain limitations – which is much better than just a free trial. So, you can keep your credit card tucked away—you won’t need it.
Setting one of these email servers up is straightforward – you don’t need to be a developer or programming languages, as all the necessary information for setup is provided in an easy-to-understand manner. These servers include secure connections using SSL/TLS encryption.
So, without further ado, here is our comprehensive list of the best free SMTP servers, ranked on a variety of quality factors:
Configuring Nginx to Use your Error Pages
Now, we just need to tell Nginx that it should be utilizing these pages whenever the correct error conditions occur. Open the server block file in the /etc/nginx/sites-enabled directory that you wish to configure. We will use the default server block file called default, but you should adjust your own server blocks if you’re using a non-default file:
sudo nano /etc/nginx/sites-enabled/default
Direct 404 Errors to the Custom 404 Page
Use the error_page directive so that when a 404 error occurs (when a requested file is not found), the custom page you created is served. We will create a location block for the file, where we are able to ensure that the root matches our file system location and that the file is only accessible through internal Nginx redirects (not requestable directly by clients):
/etc/nginx/sites-enabled/default
server {
        listen 80 default_server;
        listen [::]:80 default_server ipv6only=on;

        . . .

        error_page 404 /custom_404.html;
        location = /custom_404.html {
                root /usr/share/nginx/html;
                internal;
        }
}
1. Open Start, do a search for Task Scheduler, and press Enter.
2. Right-click Task Scheduler Library and click New Folder.
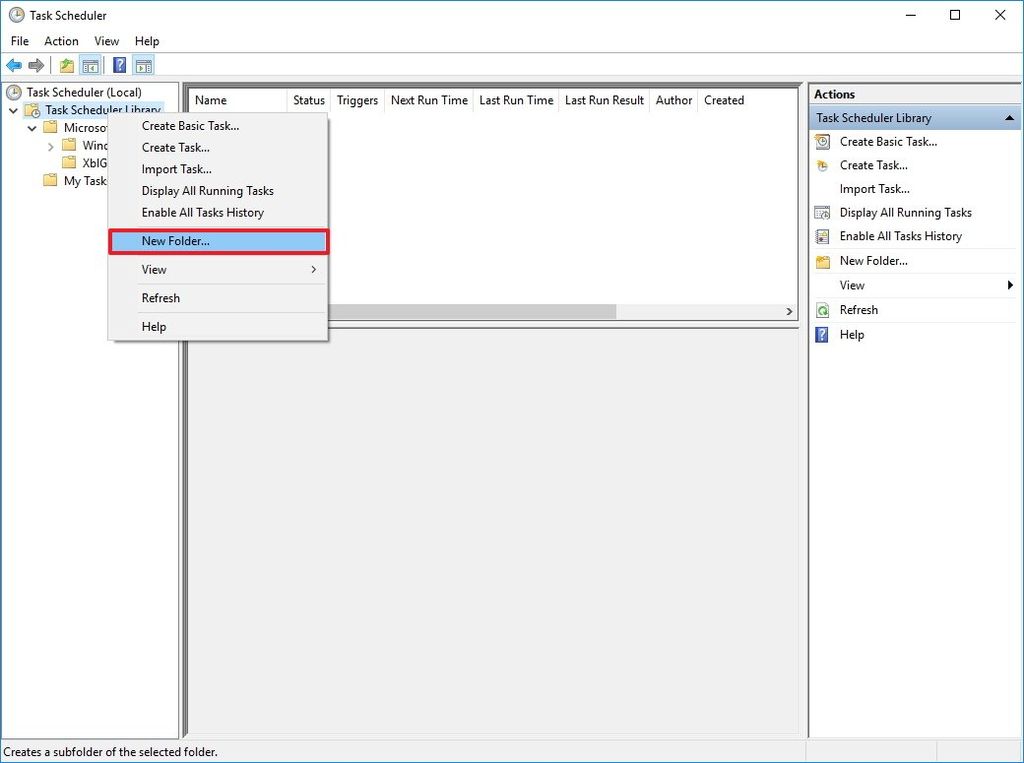
3. Name the folder My Tasks or anything descriptive. (You want to do this to keep your tasks organized and separated from the system tasks.)
4. Right-click the newly created folder and select Create task.
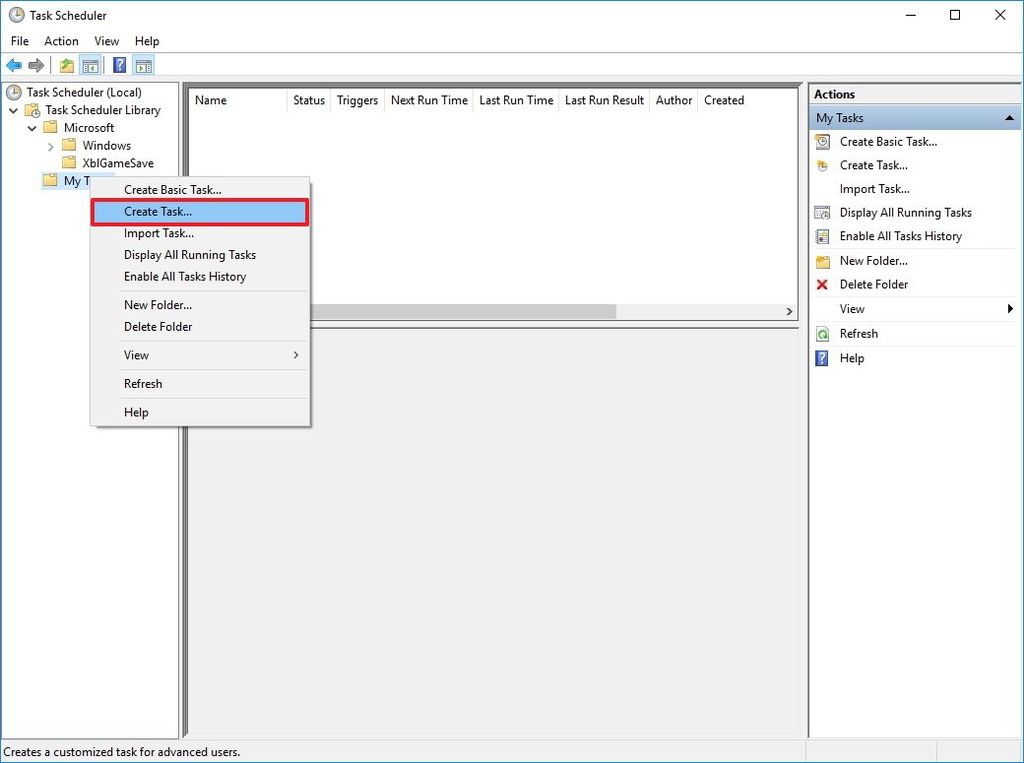
5. On the General tab, enter a name for the task, such as Empty Windows Recycle Bin.
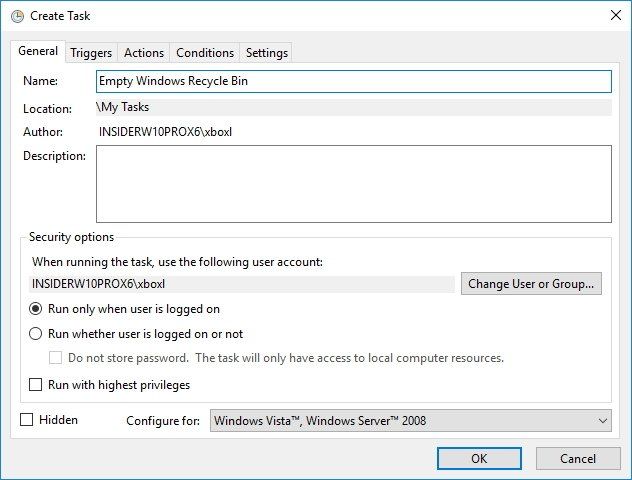
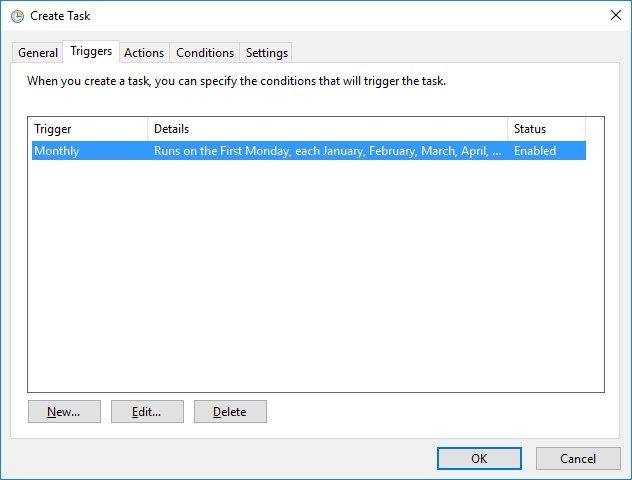
6. On the Triggers tab, click New to create an action that will trigger the task.
[Read more…]